Sunday, February 25, 2007

The English purl stitch

This is fourth of a series on "how to make knitting stitches." Previous in this series are "The English knit stitch," "The continental knit stitch," and "The continental purl stitch." Please excuse the delay: the original drawings for this post were corrupted and it was d**ned annoying most discouraging to have to start over again. However, my friend and neighbor J.A. came over, and her hands are the model for the new drawings here, so thanks J.

step 1
click picture
english purl step 1
(Above) Hold the standing yarn (standing yarn=yarn coming from the ball) in FRONT of the work. Keep it under tension with the first, third and fourth fingers of the right hand. Insert the right needle under the RIGHT arm of the "old stitch" at the tip of the left needle (green). Be sure the right needle passes IN FRONT of the left needle, as illustrated. "Dip" the right forefinger (dotted red arrows) to wind the standing yarn (brown) around the right needle (solid red arrow).

step 2

click picture
eng purl step 2
(Above) Once the standing yarn (brown) is wrapped around the right needle, swing the right forefinger down towards the floor. Dotted red arrows. This "locks" the standing yarn around the right needle.

step 3
click picture
eng purl step 3
(Above) Draw the right needle -- with the standing yarn (brown) "locked on"-- through the old stitch (green) from front to back. Solid red arrow.

step 4
click picture
eng prl step 4
(Above) Once the new loop (brown) is drawn through the old stitch (green), withdraw the left needle, and you will have a purl stitch waiting on the end of your right needle. Remember to draw the right needle to the FRONT again (as in step 1) before inserting it into the next old stitch on the left needle.

--TECHknitter

Thursday, February 22, 2007

Uneven knitting, part 1: stockinette fabric--how to tame "rowing out"

The human eye is great at seeing even the most subtle patterns, and for good reason--for much of human history, survival depended on knowing whether that shadow might be ... a tiger in the long grass, looking for dinner!

For knitters, this means the eye immediately seeks out patterns in knitted fabric--an advantage if your sweater features lovely cables. But the eye's ability to pick out patterns is a disadvantage if your sweater features the Knitter's Bane: the "rowing out" of uneven stockinette fabric.
click picture
the knitter's bane--uneven stockinette fabric
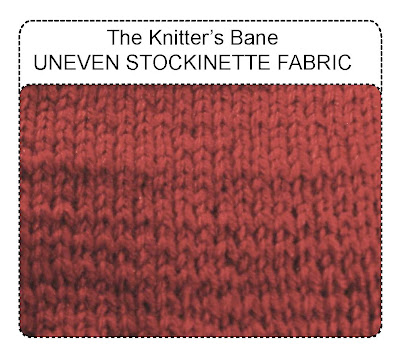
Stockinette fabric is typically made by knitting across the front and purling back. If you knit at a different tension than you purl (a VERY common problem) your fabric develops those tiger stripes the eye is so well-suited to detect. The looser row (for most knitters, the purl row; but for some knitters, the knit row) pouches out and distracts.

Below is a three-part post attacking this problem. Part 1 lays out some traditional tricks. Part 2 shows some limitations on these tricks. Part 3 lays out a final trick--a maybe new way of thinking about the problem.

PART 1: TRADITIONAL TRICKS

Many, many tricks have been developed over the years to counteract the problem of uneven stockinette fabric. The four traditional tricks I've found best are laid out below.

Trick one:
Garter stitch and circular knitting

The easiest cure for uneven stockinette fabric is never purling. There are two ways to accomplish this: garter stitch fabric, and fabric made by circular knitting.

In garter stitch fabric, there is only knitting back and forth. There is no purling. Similarly, in circular knitting, stockinette fabric is not made by knitting there and purling back. Instead, it is made by knitting endlessly, round and round.

Accordingly, for garter stitch fabric, and for circular knit fabric, it matters not at all that your knitting differs from your purling. There simply isn't any purling.

Many clever designs exist for garter stitch garments, especially those created by the late, great Elizabeth Zimmerman. As to circular knitting, many things can be made in the round--hats, sweaters, socks, even square flat things like blankets and shawls can be made without purling by working in the round if they are started from the center and worked on circular needles.

Trick two:
Adjust the tension of your hands

A more challenging solution to differently tensioned knit and purl is to teach your hands to tighten up what's loose, or loosen up what's tight. To work this, you first have to figure out which way is looser, knit or purl.

Here's how: make some fabric, ending on a knit row, and leave the fabric on the needle. Lay the fabric on a table, knit side up. Dim the overhead lights, and slant the beam from an adjustable table lamp or flashlight to throw your fabric into relief. You know that the row on the needle was made by knit. The row below that was made by purl, the row below that (2 from the needle) by knit, and so forth. Find the looser rows, and count down from the needle to figure out how they were made--by knit or by purl.

Now you're set to mess around--to experiment. Can you increase the tension on what's looser? Is it easier to loosen the tension on what's tighter? Rome wasn't built in a day, and neither did you learn to tension your yarn in a day. Change takes time and attention. Plan to make a scarf. That'll give you plenty of length to fool with tightness and looseness, and you'll be able to see your results as the scarf gets longer. In the best-case scenario, the scarf ends smooth and even, and the problem is solved.

Trick three:
Different size needles

This trick is really an extension of the second. If your hands stubbornly resist your brain, if they continue to churn out stripy fabric no matter what you tell them, the next thing to try is tricking those hands into submission.

Your experiment with the beam of light already revealed which technique is looser--knit or purl. For this trick, arm yourself with a needle of a smaller size, then do the looser technique with that.

In other words, if you are working with a pair of size 6 needles, and your purling is looser than your knitting, take a size 5 needle to purl, and keep the size 6 to knit. Remember--it is immaterial what size needle holds the stitches to be knit, the finished stitch is determined ONLY by the needle making the stitch--the right needle. This trick lets you create the looser stitches around a smaller needle, making the looser stitches smaller, and therefore tighter.

It might take time to figure out this trick--your scarf might be quite long indeed by the end of the experiment. Also, I know knitters who must use needles TWO sizes apart to tighten up the loose technique, so if at first your fabric remains stripy, try, try again.

BTW: if you're making stockinette fabric by working back and forth on circular needles, you can work this trick by screwing two different size points on each end of the cable from an interchangeable tip kit.
Trick four
Pick yarns which hide the flaw

Novelty yarn is generally thick and thin and every which way. Who cares if the purl and the knit are different? Frankly, with most novelty yarn, its hard to tell if it was made by knitting or purling at all--garter stitch is the more usual method of creating a novelty yarn fabric. Handspun yarn is also commonly available spun "thick and thin." Variegated yarns (some of which are beautifully hand dyed) and tweed yarns both help hide undesirable fabric stripes with a randomly varying color pattern--the eye is fooled away from the uneven fabric surface by the undulating colors.

* * *

All of the above tricks unquestionably work. For many knitters, these tricks solve the problem for once and for all. If you've just started attacking the uneven stockinette problem, one of these tricks could hold the solution you've been looking for. But, at some point in your evolution as a knitter, you may have bumped up against ...

PART 2: THE LIMITATIONS OF TRADITIONAL TRICKS

Garter stitch: Avoiding purling altogther can become tiresome. Garter stitch is bulky and slow to knit-- it takes a great deal more yarn to make the same length of fabric in garter stitch than in stockinette. Also, garter stitch is not suited to sleek fashions. A garter-stitch T-shirt or halter-top might be a bit odd.

As to circular knitting: at some point, perhaps the short rows back-and-forth across the back of a sweater neck or a sleeve cap, that old purling is going to rear its head. Then where are you?

As to changing your tension: If you can train your hands, this IS the best solution. Yet, experience shows that, for many knitters, when you're tired, or when you're knitting on autopilot, the hands may stubbornly revert.

The different size needle trick might work for you--it works for many--but when you want to knit with a new yarn, the relationships between the needle sizes might change--you might need two sizes smaller instead of one, you might need one size smaller instead of two. To succeed as a two-different-size-needle-knitter, you're going to have to be extremely serious about swatching each time you try out a new yarn. If this is you, great, problem solved. But, hmm...well... many knitters aren't really THAT serious about swatching.

And as for the last trick--using wild yarns, well... just as there is a limit to the number of garter stitch garments one wardrobe can absorb, so you may find that there is also a limit to the number of novelty tops, rustic handpun garments and tweed or varigated sweaters.

The upshot? Each of the tricks above works, but each is potentially limited in some way. If the limitations affect you, if you've tried these tricks and remain dissatisfied, then, the best and most lasting solution, IMHO, is what I am going to call ...

Part 3: NEAR-STOCKINETTE FABRICS

nr st fab 1 br ribNear-stockinette fabrics are those which can substitute for stockinette fabric with no alteration to the garment pattern. Near-stockinette fabrics feature a subtle surface pattern of purling on the "knit" side. Hunt through a pattern stitch book--ideal is a small all-over pattern. These surface patterns work two ways: first, the pattern itself interrupts the stripe, and second, the pattern disguises any remaining stripy-ness by inserting another, more pleasing pattern.

nr st 2 croc skin
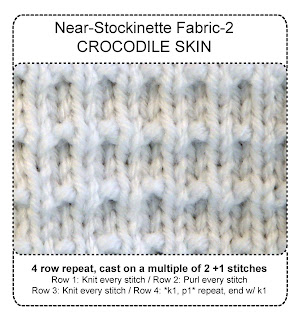
For substitution into a stockinette fabric garment, the near-stockinette fabric you choose should not alter the structural properties of the fabric. However, it turns out that stockinette can take quite a bit of alteration and not lose its basic properties --the stitch to row ratio, the tendency to curl, the direction of that curl, the weight, hand (drape) and bulk of the fabric.

speckled-purl


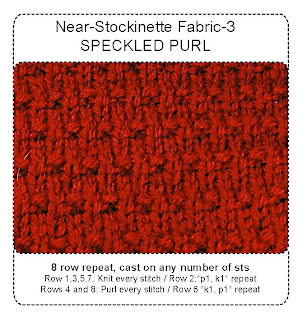
Another limitation on near-stockinette fabrics is to choose one which doesn't interfere with your garment shaping. Carrying up a line of knit stitches in a broken ribbing pattern is a lovely substitution for reverse stockinette in an aran sweater (see illustration of broken rib) but it can make decreasing for a set-in armhole challenging. A less linear, less insistent pattern, like crocodile skin or speckled purl would not raise that issue.

Don't conclude that the stitch patterns shown here are all you have to choose from--these three patterns are my particular "old standbys" for near-stockinette fabrics, but there are many, many others to choose from.

PS: This post is part of a three-post series. The other posts in the series are:
Uneven Knitting, part 2: Bunching, big stitches and lumpy fabric--the problem of too-long runs.
Uneven Knitting, part 3: Fixing the loose column in ribbing, texture and cables

Good luck!
--TECHknitter

Tuesday, February 20, 2007

Chain selvedge a.k.a. "slipped selvedge"

includes a how-to
If you slip the first stitch of every row (or every last stitch--makes no difference) you will get a lovely chained selvedge--a big improvement over the lumpy bumpy edges much knitting exhibits. When the time comes for picking up stitches (for a neck edge or a front band, or around the heel tab of a sock) you will be glad you have lovely, even chains to pick up through.

Here is chain selvedge by the "slip the first stitch" method, in four illustrated steps.

1. (Below) Knit the last stitch of the row through the back loop (tbl), as illustrated.
click picture
chain selvedge step 1
2. (Below) Draw the new stitch (green) up onto the right needle (brown) with the right "arm" of the new stitch forward, as illustrated. Withdraw the left needle (blue), leaving all the stitches on the right needle.
click picture
chain selvedge step 2
3. (Below) Switch the needles in your hands. The needle which used to be the right needle (brown) has become the left needle with all the stitches on it, the needle which used to be the left needle (blue) has become the empty needle held in the right hand. With the right hand holding the empty needle (blue), DO NOT KNIT the first stitch (green), but merely slip it PURLWISE from the left needle to the right needle. Knit the rest of the stitches as you normally would, until you come to the last stitch. Repeat from step 1 through 3 for the length of the knitted piece.
click picture
chain selvedge step 3
4. (Below) If you have followed the above instructions, the slipped stitch should lie "open" as illustrated on the left.
click picture
chain selvedge side view
--TECHknitter

PS: Note that if you choose to work a slipped selvedge, it is very common to add 1 stitch at each edge of your knitting (2 stitches total).  In other words, if your pattern calls for casting on 30 stitches, you would actually cast on 32, thus assuring that your slipped selvedge in no way interferes with whatever the pattern instructions are.  Naturally, if you look over the pattern and see that the edges are simply plain anyway, you could just work the slipped selvedge on the two edge stitches without adding. Yet, even in this context, many confirmed slip-stitches would go ahead and add the two stitches anyway, out of habit.

Monday, February 19, 2007

How to make an I-cord

includes a how to
We have Elizabeth Zimmerman to thank for popularizing this simple, knitted cord (as she did so many other wonderful knitting tricks). If the illustration isn't self-explanatory, here are some written directions:
click picturei cord
  1. Cast on 3 stitches on a double pointed needle (dpn). (For I-cord, I prefer the the "disappearing loop" method, but don't let this discourage you--ANY method of casting on 3 stitches will work very well.) Leave a tail dangling.
  2. Slide the stitches back along the dpn so that the ball yarn comes out of the left side of the 3 stitches, and the first stitch cast on lies on the right tip of the left needle.
  3. With a second dpn, pull the yarn around the back of the 3 stitches, and knit the first stitch on the right tip of the left needle from this position.
  4. Repeat steps 2 and 3 until the I-cord is as long as you want.
  5. Cast off by threading a needle with the ball end of the yarn, run this yarn though all three stitches once or twice, drawing up tightly after each three stitches.
  6. Run the remaining tail through the middle of the cord, bring the needle out the side of the cord, snip the excess, and tug the I-cord to make the snipped tail slip back inside the I-cord forever. Repeat with the tail left over from casting on.
BTW: I-cord stands for "Idiot cord." Presumably the idea is that anyone could make one.
~~~~~~~~~~
Related posts:

~~~~~~~~~~
--TK

Sunday, February 18, 2007

Velcro and hand knitting--a haiku of pain

Chalk screeching on blackboard.
Dentist's drill in my mouth.
Handknit hat ripping loose from the velcro tabs of my winter jacket.

* * *

Next time I buy a winter jacket, it's honest buttons or a large toothed zipper. I hereby forswear velcro.

--Techknitter

Thursday, February 15, 2007

Casting on from the middle--disappearing loop method

includes a how-to, there's a link to a video at the end, too

For knitted objects started in the middle, (shawl, hat) choose the "disappearing loop" method to cast on. Unlike the famous "Emily Ocker's beginning" of which you may have heard, disappearing loop is superior because:
  • There is no slip knot, so there is no hard nub in the middle of your work.
  • The first stitches are not crocheted, so they are not larger and heavier than the rest of the work.
These advantages make disappearing loop the cast-on of choice for lace and the tops of hats, but any center-start knitting (even I-cord!) looks better with disappearing loop.

HOW TO
1. Make a loop over two fingers of the left hand, as shown. The tail end lies OVER the ball end. In your right hand, hold a double-pointed knitting needle several sizes smaller than you will use for the knitting. Make the first stitch (follow the red arrow) by reaching OVER (not through) the loop, and catching the standing yarn (standing yarn=yarn coming from the ball, also called the "ball end") "up from under" to form a stitch which lies over the needle.
click picture

step 1 disappearing loop
2. Make the second stitch (follow the red arrow) by reaching THROUGH the loop, catching the standing yarn "up from under" and drawing the standing yarn back out of the loop, to form a stitch which lays over the needle.
click picture

step 2 disappearing loop
3. Make the third stitch (follow the red arrow) as you made the first one: reach OVER (not through) the loop, and catch the standing yarn "up from under" to form a stitch which lies over the needle. Click here for an explanation of how each finger is deployed in the illustration below.
click picture
step 3 disappearing loop
4. Continue, making each odd stitch OVER the loop and each even stitch THROUGH the loop and until you have the EVEN number of stitches you need (if you need to cast on an odd numbers of stitches, see point 7, below)
click picture
step 4 finished produce disappearing loop
5. Distribute the stitches onto 3 or 4 dpn and join the work by using the standing yarn to knit through the first stitch cast on. Do not bcome discouraged if the needles drop out--which they WILL do several times, until you finally prevail. (HINT: try different needles until you find the ones which work best for you--bamboo needles are maybe easier for knitting with few stitches where needles are apt to fall out...)


6. After several rounds, tug on the tail end. Ta da! The original loop into which you were working will disappear, and your work will feature a beginning rosette of the even, attractive stitches you worked into that loop. (HINT: give the tail an experimental tug right away, after first joining the work just to be sure the loop CAN tighten and didn't get tangled while making the join. If the tail end did get tangled up, try, try again.)
click picture
finished product in the wool disappearing loop cast on
7. If, for some reason, you need an ODD number of stitches (a seven-section hat top?) make the loop with the BALL end on top, and make the first (and all odd) stitch(es) by going THROUGH the loop for the first stitch, then OVER the loop for the second (and all even) stitch(es). This way the odd stitch with which you want to end (the last stitch) is "held in" by having been made through the loop.

A final note: Does this sort of cast-on look familiar to you from another context? Perhaps you have used this technique in making a kind of provisional cast on called "invisible cast on." For invisible cast-on, instead of making a loop into which to work, you hold a length of scrap yarn along a straight knitting needle and conduct this same series of manuevers over and under the needle and the scrap yarn. You then withdraw the needle and leave the loops on the scrap yarn until you're ready to expose the stitches. When you withdraw the scrap yarn, you'll see live loops, waiting to be knitted up.

However, IMHO, there exists a far better provisional cast-on (illustrated here)
so I'd save this trick for working into a "disappearing loop" for center-started knitting.


ADDENDUM September 2009:  As beautiful as this cast-on is, some folks have been having a hard time following the diagrams.  In real life, you could learn this trick in 5 minutes, but it IS hard to learn from diagrams, no doubt about it.  At any rate, if you like the look of disappearing loop, but are having a hard time of it, then click over to this post: Knitting from the center--belly buttons and the umbilical waste cord method."  Although they do take a little longer, knitted belly buttons end up with the same structure and look as disappearing loop, and are easier to learn from diagrams.

ADDENDUM April 2017:  Here is a video from a reader, Judy Vallas, showing how to do this cast on.


--TECHknitter

Monday, February 12, 2007

Adding a new ball of yarn in the same color

Today: "Joining yarn," or "What to do when you're at the tail end of the old ball of yarn, and you need to add in a new ball of the same color." (Here is a LINK to a post for adding in balls of a different color for multi-color knitting).

An urban myth of knitting is that new yarn always ought to be added at the end of a row (side of the fabric) (scroll).

On the one hand, if you are knitting an item to be seamed, this advice can be good (see trick the third, below).

On the other hand, for items where the edge of the knitting is the edge of the garment (scarf, shawl, stole), or for items where you plan to add an edging, this advice is pretty bad. Adding yarn at the end of a row can leave a big loopy gap along one side of your knitting, and/or a lump where the ends are worked in. The side of your work is probably an inconvenient spot for that gap/lump.

Also, advice to put the yarn change in the seam is of little use to circular knitters.

Another myth is that yarn should be "tied in" with a knot. I've ranted elsewhere against knots in knitting--even slip knots, and won't repeat here. I will add, however, that even the tightest knot has the potential to come undone over time with the kind of wear a knitted garment will get.

Anyway--enough about what won't work. Here are three tricks for adding a new ball of yarn.

Trick the first--felting
(fair warning: if you're squeamish, skip straight to trick the second)

Evidently, the oldest kind of yarn-made fabric is nalbinding. It is made with a large-eyed flat bone-type needle, using short lengths of yarn--originally, the sort of primitive yarn spun by rubbing it between the palms.

Obviously, a major nalbinding issue is how to attach each short length to the next.

Nalbinders solved this problem long ago--maybe in the ice ages--by felting the ends of the yarn together with (this is the squeamy part) spit. Today, most choose to use water, but if you're lazily knitting in bed .... well, just resolve to thoroughly wash your knitting before wearing.

HOW-TO felt the ends

Overlap the ends of the yarn in your hand--by maybe a couple of inches. Add a small amount of the liquid of your choice, and rub the ends between your fingers and your palms or between both palms, until the ends felt. Yup, that's it.
click picture
felting the ends of yarn togetherOf course, the more you practice, the less lumpy the join will be--you can fool with separating the plys in plied yarn before you felt, and fool with the correct amount of liquid, and fool with the rolling action of the felting and fool with the amount of the overlap. However, this isn't rocket science--if cave (wo)men could do it, so can you. A couple of quick experiments will show you the best technique to make the resulting join pretty much invisible in whatever wooly yarn you're using. And of course, by this method, there are no ends to work in.

BUT--felting works best on wool--preferably thickish wool. Felting is a poor choice for thin yarns, such as lace, because even the most careful felted join will show against the lacy fabric. And felting works not at all on non-wool yarns. Which brings us to...

Trick the second--overlapping

HOW-TO overlap

Overlap the new end and the old end. Knit THREE stitches with both yarns, then drop the old yarn.
click picture
three stitches made with old ball and new ballBe sure there are several inches of EACH end hanging down.
click picture
view of ends on back--overlap method of joining yarnThe overlap may look bulky, but this is temporary.
click picture
overlapped stitches before tension is adjustedSeveral rows or rounds AFTER the joining, carefully adjust the tension by gently pulling on each end in turn. In heavy work, pull tight enough so that the stitch attached to that end will shrink behind the not-pulled stitch and disappear. In lace work, tug each end carefully only as hard as it takes to make all six overlapped stitches the same size--see photo of lace work below.
click picture
overlapped join after tension has been adjustedThe central stitch, in which both yarns lay unpulled, will be slightly larger than the stitches on either side, but even in loose lacy knitting, where there is little tugging, this join hides.
click picture
overlap join hides in loose lacy fabricIf you're working in heavy wool, you clip the ends after you've washed and blocked the garment. Leave a short end (1/2 inch) still sticking out--over time, it will shrink into (and felt onto) the fabric as the garment is pulled and twisted in everyday wear. After several further washings, when you're sure that little tail will shrink no further, you can clip it down as far as the fabric surface with a clear conscience. In woolen lace, where both sides of the fabric are designed to be seen, wash and block the item. When dry, stretch the area of the overlap several times to adjust the tension before clipping the excess very near to the fabric surface.

With non-wool yarns, three stitches MIGHT be enough to hold the ends for all times, and it might not, depends how slippery the stuff is. I find that superwash wool, for example, requires more, so I'll sometimes work 4 overlapping stitches. If you have doubts, then use the overlapping method of join PLUS, for insurance, work your ends in further using whatever method you generally use, before you clip the excess. (Working-in ends will be the subject of a future post...)

If there is a pattern to your knitted fabric, think about placing your overlapped stitches there, rather than out in a flat, smooth stockinette stitch area. The 3-stitch-overlapped join is nearly undetectable, but by placing it in a pattern--where the eye is already predisposed to accept a disturbance--you have additional insurance that no one will ever notice.

Trick the third--for items to be seamed

A reader of this blog, Noricum, gets the credit for this trick.

For garments which will be seamed (sweaters made in pieces, for example) the idea is to change balls at the side (seam edge) and leave a long tail from the new ball AND the old ball. When the time comes to seam the garment, use the long tails for the sewing yarn--remember to cross the yarns, one going up, and one going down, in such a way as to draw closed the gap where the new ball comes in. Thanks Noricum!

* * *
PS:  Here is a link to a post with 10 (!)  different methods of working in ends in knitting, eight of which are "as you go."
* * *

--TECHknitter

Saturday, February 10, 2007

Flat knitting (back and forth) on circular needles--how and why

back and forth on circular needlesclick picture
HOW TO KNIT BACK AND FORTH ON CIRCULAR NEEDLES

Is it a mystery to you how it is possible to knit flat objects back-and-forth on circular needles? If it isn't a mystery now, I'll bet it once was.

Here is the secret: Think of each tip as a separate needle. Cast on the stitches you want. Next, put the tip formerly in your right hand into your left hand, the tip formerly in your left hand into your right hand. The fact that the tips are joined around the back need not concern you at all. Knit normally. When you've knitted all the stitches off one tip, turn the whole business around by again putting the tip formerly in your right hand into your left hand, and the tip formerly in your left hand into your right hand. Keep on doing this until it all makes sense.

WHY TO KNIT BACK AND FORTH ON CIRCULAR NEEDLES

Why, you might be asking yourself, would anyone want to knit back and forth on circular needles? Why not just use straight needles?

There are a few reasons.
  • Less lethal: It's actually scary to watch a 6 year old zooming in for a hug when mom is working a pair of long straights.
  • Public knitting: At conferences, seminars, movies--wherever others may think that you're not "supposed" to be knitting--circulars eliminate the distinctive clang of one needle hitting the floor... at crowded events you're less likely to lose a needle. .. you're less likely to poke the stranger in the next seat on a packed plane, bus or subway.
  • Security: A long pair of nice pointy aluminium 10 1/2's at the airport? Maybe not... Same size in circulars? You've probably got a better chance. Circulars pack better too. (Remember--if you're traveling abroad, even if those long sharp things are OK at the US end--as knitting needles currently are--they might not be when it's time to go through security at a foreign airport to come home again.)

For heavy work with lots of stitches, there is a division of opinion as to whether long straight needles or circular needles are better. In my opinion, circular needles will give nearly every knitter a better result--although some straight-needle knitters strongly disagree. Here is the debate laid out:

Some straight-needle knitters stabilize their straight needles by using very long ones, tucking one (or more) under their arm.

click picturelong straight needle tucked under arm
This is a modern version of the knitting belts and sheaths used by the old production knitters (and some traditional knitters even up to this day). Once long straights are stabilized in this way, the weight of the work is also transferred. This method of efficiency leaves the fingertips free to maniplate the stitches without having to carry the weight of the fabric. There are other ways to stabilize long straight needles also--some knitters tuck the needles into their sleeves, and I once saw a knitter with her left needle tucked into her watchband. Some of the very fastest knitters of all times knit with a stabilized needle or needles.

HOWEVER, few US knitters knit with sheaths or belts--and most straight-needle knitters do not stabilize their ends, or transfer any weight by tucking. Realistically, therefore, the choice is is often between straight needles held in the hands (ends left untucked) and circular needles.

Under these circumstances, I think that circular needles have a better chance of yielding a superior result for flat back and forth knitting of large objects.

With circular needles, the needles are attached by the cable. This allows both hands to support the weight of the work even at the end of a row of 274 stitches, for example. With straight needles, all these stitches would be all bunched up on one needle or another at every row end, but with circulars, the work stays mainly on the cables, with only a few stitches on either tip. Stated otherwise, the shape of the circular needle cable and tips lets a lot of the weight of the work rest in your lap. If all those stitches were hanging from one needle, as they would be at the end of every row knitted on long straights, that'd be a lot of weight to swing around with every stitch--exhausting work, actually, and the weight shift from hand to hand often makes the gauge go off.

Also, the cable of a circular needle is a smaller diameter than the tips. That makes it possible to squish a LOT of stitches along the cable. Have a look at this chart which shows minimum and maximum stitches which can be stretched or squished onto circular needles of different lengths, and imagine trying to squeeze the higher-end numbers onto even the longest straights.

--Techknitter

Tuesday, February 6, 2007

Gauge-less gauge swatches, or "dating tips for knitters"

You've read the blah, blah, blah advice a hundred times--make a gauge swatch before you start knitting your garment. Wash the gauge swatch. Dry the gauge swatch. Measure the number of stitches and number of rows per inch to be sure you're getting the same gauge as the pattern calls for. Adjust to smaller needles if you need to get more stitches per inch, larger needles for fewer stitches per inch. Blah, blah, blah.

If you do all that stuff, congratulations--you are a sober, mature person with whom it would be a honor to shake hands--a beacon, a knitting role model. You're all set--no need to read further--read a different blog for today.

Back here in the real world, there's a ball of yarn screeching to be knit, and a pattern demanding to be started NOW. You know you shouldn't, but sister, you know you're going to do it anyway--grab the needles recommended in the pattern, cast on, and hope for the best.

It's a classic in philosophy--what happens when an irresistible force meets an immovable object? What happens when your irresistible desire to start NOW smacks up against the stone-cold fact that, without a gauge swatch, you're most unlikely to actually accomplish that flattering, graceful garment in which your imagination clothes you? Will you stop and reconsider? Will you actually make a gauge swatch? Maybe--but if you're still reading, I'm not laying money on it.

So, how shall you tame the mighty urge?

I have one word: gaugeless objects. (OK, that's two words. But it's still the answer.)

If you're ready to make a whole sweater, starting right NOW, that's puppy love. You've got to face it--you're in the grip of a crush. But no matter how HUGE the crush, you'd never marry that cute guy before you went on even one date, would you? What if he snores? What if he already has a wife? What if on closer inspection, he's unacquainted with the concept of soap? So how about a date with your new yarn--just one date? Check it out, just once, before you commit to slogging through the sleeves (two) the fronts (two) and the endless back; or, for circular garments, the doubly endless tube to the underarms.

Classic gaugeless objects are scarves, potholders, pillow tops, quilt squares and hats. Wouldn't it be a testament to your skill to have a one-of-a-kind unique and amazing patchwork pillow around the house made with one square from every project in recent times? How about a set of potholders, ditto? A quilt?

You might think I'm tricking you into knitting a gauge swatch and just calling it something else. And maybe so. But then, maybe not. Today's fashions are adorable, flattering and short. Maybe it makes actual sense to have a matching shawl to cover the shivery parts left uncovered?

And, maybe you'll be glad you've got that potholder made ahead for your Christmas gift basket when you realize that the yarn with which you were planning to have a long term relationship is a flirt, a liar and a come-on artist. What if you HATE the yarn after you start working with it? What if that hand-dyed, hand-spun one-of-a-kind masterpiece skein turns out to be overtwisted? What if you discover that P5tog (purl 5 together) pattern, although exceeding beautiful, has a side you weren't expecting?

Have I convinced you? A little bit, at least? If so, here are some considerations.

HOW TO go on a date with your new yarn

First, buy only one ball of yarn for a start. If it's too late--if you've already succumbed to the desire to possess massive quantities of THAT yarn right NOW, at least keep the receipt handy--think of it as your rescue call if your first date is going sour. And for heaven's sake, DON'T wind all that yarn off the hanks into balls before your gaugeless object is complete and your decision made to proceed--once it's wound, it's yours.

Second, make the gaugeless object with the exact yarn and with the exact stitch pattern you're going use for the garment. If the garment is in moss stitch, it helps you not at all to have a stockinette stitch object. (Yup, it's obvious. Yup, I've messed up on this myself...)

Third, change needle sizes at least a couple of times over the course of your object. That way, you've got a better chance of actually nailing the desired gauge, and who cares if the gauge for a scarf or potholder or quilt square wanders?

Fourth, make the gaugeless object with the same technique as the garment. If the garment is made back and forth, make the object back and forth--a potholder, quilt square, pillow top, skinny scarf.

If the garment is made circular, cast on enough stitches to go round on dpn's (double pointed needles) or your smallest circulars, and make a gaugeless circular tube neck-scarf. Other than sewing up the ends if you're inclined to, a skinny tube neck-scarf features no finishing at all--all those dangling ends from color changes, etc. will be on the inside and will never, ever, be seen by any mortal again.
click picture
If even a circular neck-scarf is too much work--if you're too deeply smitten by the "right now" bug to go round and round for so long, at least make a potholder by using the method for "circular swatch knitted flat," illustrated below. (For a potholder, cut the ends and tame them by knotting or felting)
click picture


Most important, after you make your gaugeless object, LOOK AT IT. Do all the blah blah blah stuff. Wash it. Measure it. Be honest with yourself. Ten and a half stitches over 2 inches isn't the same thing as five stitches per inch. It just isn't. But, because you were foresightful, and made your gaugeless object with several different needle sizes, you've got exactly ten stitches to 2 inches in there somewhere.

And finally, I've said it before, and I'll say it again. For each garment you make with the same yarn and needles, you'll get an increasingly professional result--your body of experience with that yarn and those needles will make more likely a "handmade" result, as opposed to a "home made" result. And after the first garment, you won't even have to swatch at all.  (Have a look at these made-more-than-once projects on Ravelry to see the lovely possibilities.)

--TECHknitter

Saturday, February 3, 2007

Kinky yarn

includes a how-to
Recent minor events brought two kinds of kink to mind. No, not THAT kind. I mean the kind that happens when yarn doesn't lay straight as you try to knit it.

FIRST kind of kink--
knitted-in kinks
click picture
As I sat by a friend at a local guild meeting, she noticed a mistake a few rows down. She ripped, then began to knit up again. BUT--the yarn she'd ripped out was kinked. Her project must have sat for at least a couple of days--long enough for the yarn to set up in the loops and shapes of her knitting.

If my friend had kept knitting, her gauge would have suffered. Each stitch knitted with kinked yarn would take a longer, loopier, kinkier path around the needle instead of laying smooth as it should. Knitted-in kinks usually come out with moisture, so once the garment was washed, the kinks would have relaxed. The portion my friend had knitted with the kinked yarn would have been off-gauge--wider and messier than the rest of the fabric. True, that's not too bad for a couple of rows on a child's sleeve or the sole of a sock. But bad gauge on the breast of a woman's sweater might be a different story.

HOW TO relax knitted-in kinks

Method 1: steaming
Make a loose skein of the yarn to be de-kinked and lay it on the ironing board.  Set a steam iron to high and let it heat thoroughly.  If your iron has the "shot of steam" feature, so much the better, but any steam iron will work.

You don't actually iron the yarn, NO! For WOOL (as shown in the you-tube below) you can sorta-almost actually touch the yarn--not ever rest the iron on the yarn, you understand, but get it pretty darn close, just for an instant or two.  For non-wool (especially acrylic) do NOT get as close as shown in the video below, instead, hold the steaming iron an inch or so ABOVE the yarn.


If the above you-tube link is broken, the video is at https://www.youtube.com/watch?v=CybCGICrris&t=5s (Cut and paste address into your browser.)

When the yarn is soft and steamy, smooth it gently, then wind it and you can instantly re-knit it.
click picture
how to wind a hankMethod 2: Wetting
 Swish the hank briefly in warmish water. If the kinks persist, add some yarn-friendly soap, swish, then rinse in water of the same temperature. If the kinks come out, good. Roll up the hank in a towel, squish firmly without stretching, then lay to dry on a sweater-dryer or a different (dry) towel. However, if the kinks still don't come out with this amount of washing, AND IF the yarn you're trying to de-kink is only a portion, but not all of the yarn for an already-partly-knitted garment, you might have a problem.

See-most yarn will de-kink if you mash it around long enough. The problem is, the more you pull and twist, the more the de-kinked yarn changes. It might get thicker (felt) it might get thinner (stretch). Whichever way it changes, the de-kinked yarn might knit up differently than the never-kinked yarn in the rest of the garment. So IF you find that you have to seriously smack your yarn around to get the kinks out, AND IF the yarn you're trying to de-kink is only a portion of the yarn for an already-partly-knitted garment, you might want to quick cruise on down to the LYS and see if they have another ball or two in that dye lot...

If you need to de-kink a lot of yarn--enough to make a whole garment OR you need to de-kink some yarn, but the rest of that yarn is not yet knitted, then you have no worries. If you can de-kink the yarn with gentle methods, just de-kink what's kinked. If you need to seriously smack the yarn around to de-kink it, then make up all the yarn, the kinked and the never-kinked, into hanks and wash it all up the same. Feel free to smack and twist your yarn as much as you need to, to get the kinks out. Just be sure to smack around the never-kinked yarn too. Because all the yarn is getting the same treatment, there's no problem of differing gauges between the de-kinked and the never-kinked--it's all getting washed and processed the same. Just be sure to knit the gauge swatch out of yarn that's been through the same washing process.

The bad thing is, sometimes it's not you--it's the yarn. There really is some yarn that never wants to de-kink. With yarn this stubborn, you might try to tame its woolly little kinks with a spray-on fabric-relaxer like Downy Wrinkle Releaser. If that still doesn't work, you'll have to make up your own mind what do with it--potholders come in handy, and make nice little gifts.

SECOND kind of kink--
overtwisted yarn

A knitter at my LYS was knitting a sock. The yarn twisted, snaked and kinked as it went onto her needles. Perhaps the yarn was overspun at the mill, perhaps the yarn was center-pulled, then rewound hard to say. What was clear, however, is that the yarn wanted to writhe and kink because it had WAY too much twist.

When this kind of overtwisted kinky yarn is knitted up, the whole garment fights itself. The fabric never lies smooth, it humps and bumps, especially if the extra twist is worked down and corralled onto a short stretch of yarn, and then this extra-twisted portion is knitted up over a few stitches or the entire garment biases (or both).

Twisted kink is actually harder to eliminate than knitted-in kink. The best thing you can do is try to corral the excess twist down to one length of yarn, snap the work together with a rubber band so it doesn't unravel, hold that length of yarn in the air with the work dangling at the bottom for a weight, and let the whole business slowly untwist. Of course, you have to constantly work to corral the excess twist down the yarn, and then untwist every few lengths knit, so progress is S-L-O-W. If you find you have this kind of twisted kink, think about returning the yarn. Or, again--potholders?

Good knitting! --TK

Friday, February 2, 2007

The stitch and the needle it rode in on

Left and right needles of a different size
If you've ever knitted even one stitch, you know that the size of the needle determines the size of the stitch. Bigger needles make bigger stitches, smaller needles make smaller stitches. That's why needle size matters.

What may not be so obvious, however, is that once you've knitted the stitch, that stitch will not change shape or size, even if you later manipulate it using a different size needle.

click picture

In the photo above, the left needle is smaller than the right needle. But because the stitches were made with the right needle, a smaller left needle won't affect the gauge or the tension.

Here are three real-world examples.

1. Suppose you are a dreadfully tight knitter. No matter how you try, you cannot relax your tension. The stitches are hard to push around. Knitting exhausts you.

For circular knitting, at least, you can solve this problem without brandy.

Buy an interchangeable knitting needle kit--a packet of interchangeable tips which fit on a series of cables of all sorts. Screw the tip you need for your gauge onto one side of the cable. Holding this tip in your right hand, use it to knit-- to create the loops which become the "new stitches." Screw a much smaller gauge needle onto the other side of your cable. Holding this smaller tip with your left hand, use it to feed the "old stitches."

Because the left "holding" needle is so much smaller than the right "creating" needle, the stitches will easily slide around, and your tight tension will be at least half-tamed. This trick works because, once you've created the stitches using the right needle (the one at the proper size for your gauge), you cannot change the size of those stitches by knitting them off a smaller left needle.

2. Another example: Suppose you've made a mess on a complicated knitted fabric of some kind--a lace scarf for example. You now want to rip back to some point before you made your mistake. You would locate a plain row, and without ripping back anything for the moment, you'd pick up the stitches of that row on the very thinnest needle you can find. Once those stitches are safely on the very thin needle, remove the needle used to knit the lace, and rip the lace back, past the mistake, to where the plain row is impaled on the thin needle.

Once you've ripped back and have the stitches of the plain row sitting there, you can knit those stitches right off the thin needle--no need to transfer those stitches onto a larger needle. As long as the needle doing the knitting is the needle size used to create the lace in the first place, the size of the "holding needle" will not change the size of the stitches.

3. Final example: Stitch holders are a much smaller gauge than the actual needle used to produce the stitches being held. Most knitters transfer the stitches from the stitch holder back to a needle before knitting further. But there is no reason to go to all that trouble. If the design of your stitch holder allows, no harm will come to your gauge or tension if you knit the "held stitches" right off the stitch holder, as long as the needle doing the knitting is the correct gauge.

The moral of the story: In knitting, all the matters is the size of the needle DOING THE KNITTING (commonly, the right hand needle). The size of the holding needle (commonly, the left hand needle) DOES NOT MATTER.


--TECHknitter